Last updated: August 20, 2026
Salt water does not damage an engine while you are running it. It does the damage afterward, sitting in the cooling passages while the boat dries on the trailer, leaving crystals behind that build up over months and years until a passage restricts and the engine runs hot. Flushing is how you get the salt out before that happens.
It takes about ten minutes and needs no tools beyond a hose and a flush attachment. What it does need is a fixed routine, because the two ways to get it wrong, running the engine dry or rushing the flush, are both easy to do without noticing. Here is the sequence that keeps it safe.
This article contains affiliate links. If you buy through them, we may earn a commission at no extra cost to you. Learn more.
Quick Answer
How do you flush a boat engine after salt water?
- Park level with the outboard tilted fully down, then attach muffs over the intakes or connect to the flush port.
- Turn the water on fully before touching the key, and confirm water reaches both intakes.
- Start the engine only if your method calls for it, check the telltale within seconds, and idle in neutral.
- Shut the engine down first, then turn the water off, then tilt the leg down for storage.
Bottom line: water on before the engine, water off after the engine. That order is what protects the impeller.
Why Flushing Matters
Marine cooling systems are open circuits. Water is drawn in, run through the powerhead or block, and expelled. When that water is salty, evaporation in the warm passages leaves salt behind, and each trip adds a little more. Over time deposits restrict flow, which raises operating temperature and stresses the whole cooling system.
Fresh water dilutes and carries out most of what is in there before it dries. That is why flushing after the trip, not the next weekend, is the habit that actually protects the engine. Silt and mineral deposits accumulate in fresh water engines too, so the routine is worth keeping either way.
Step One: Set Up Before You Touch Anything
Park the trailer somewhere level with room to walk around the engine, and tilt the outboard fully down so the leg is vertical. Make sure the hose reaches comfortably without stretching, since a hose under tension is a hose that pulls a muff off the leg halfway through.
Check that the engine is out of gear and stays that way. On an outboard, verify the telltale outlet is clear by poking a piece of light wire or a paperclip into it, since a blocked telltale will make you think there is no flow when there is.
Step Two: Attach the Muffs or the Flush Port
Clamp the muffs so the rubber cups fully cover the intake screens on both sides of the lower unit, and check they are seated by looking at them from behind rather than assuming. A cup that half covers a screen lets the pump draw air, which is the same problem as no water at all.
If your engine has a built-in flush fitting, thread the adapter in instead. That is the simpler route and it removes the seating question entirely. Our motor muffs guide covers matching the cup width to your gearcase, and our flush kit comparison covers the port method.

Step Three: Water On First, Always
Turn the hose on fully and confirm water is arriving at both cups before you go near the key. A water pump impeller depends on that supply from the moment it turns, and running dry for even a few seconds can start shedding vanes. Full flow matters, not a trickle.
If you are using a flush port with the engine off, this step is the whole flush. Let it run for the time your manual specifies, then shut the water off. Do not start the engine unless the manual for your specific model says to.
Step Four: Start and Watch the Telltale
With water flowing, start the engine and look immediately for the telltale stream. It should appear within a few seconds. If it does not, shut down straight away and investigate rather than giving it another moment to sort itself out, because that moment is the impeller’s whole lifespan.
Idle Only, and Stay With It
Keep the engine at idle in neutral for the full flush. Muffs cannot supply the water volume a running engine draws above idle, so revving defeats the purpose and risks the pump. Stay next to the engine the whole time. Hoses kink, muffs slip, and neither announces itself.
Step Five: Shut Down in the Right Order
Run for the time your manual specifies, generally long enough to reach operating temperature and cycle fresh water through the whole circuit. Then shut the engine off first, and only after it has stopped, turn the water off. Reversing that order runs the pump dry for however long it takes you to reach the key.
Remove the muffs, and leave the outboard tilted fully down so the gearcase and cooling passages drain by gravity. That last detail is free and it is the difference between a drained leg and one holding water on a cold night.
The Routine in Order
| Step | Action | Check before moving on | Why it matters |
|---|---|---|---|
| 1. Position | Level ground, leg tilted down | Hose reaches without tension | Muffs stay seated |
| 2. Attach | Muffs over intakes or port adapter | Cups fully cover both screens | Pump draws water, not air |
| 3. Water on | Hose fully open | Water reaching both cups | Impeller never runs dry |
| 4. Start | Engine on, neutral, idle | Telltale streaming in seconds | Confirms flow through the circuit |
| 5. Run | Idle for the time in your manual | Temperature normal, flow steady | Fresh water reaches everything |
| 6. Shut down | Engine off, then water off | Leg tilted fully down after | Protects pump, drains the leg |
Adding a Salt Removing Solution
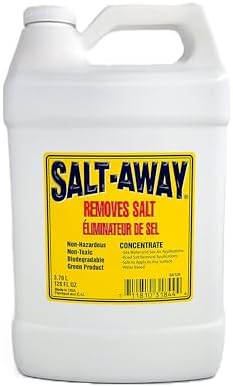
Fresh water dilutes salt, while a salt-removing solution is formulated to help dissolve deposits that have already formed. It is drawn into the water stream with a mixer during the flush, left to sit for the time on the label, then rinsed with plain fresh water afterward.
It is worth it on boats used regularly in salt water and optional on a freshwater boat that takes the occasional coastal trip. Follow the dilution on the bottle rather than estimating, since the concentration is what makes it work.
Mistakes That Cost an Impeller
Starting before the water is on, and shutting the water off before the engine, are the same mistake in two directions and between them account for most avoidable impeller damage. Build the habit around a single sentence: water on first, water off last.
The others are revving on muffs, walking away mid-flush, and skipping the flush entirely because the boat only spent a few hours in salt. Salt does not need a long exposure to leave deposits, it just needs to dry in the passages.
Frequently Asked Questions
How long should I flush a boat engine? Your engine manual gives the time, and it is generally several minutes rather than a quick rinse. On a running flush, the aim is reaching operating temperature so the thermostat opens and fresh water reaches the whole circuit.
Do I need to flush after every salt water trip? Yes, and ideally the same day. Salt does its damage while it dries in the passages, so a flush the following weekend has already missed most of the benefit.
Can I flush without running the engine? If your engine has a built-in flush fitting, that is exactly what it is for, and many manufacturers specify engine off for that procedure. Without a flush port, you need muffs and a running engine.
What if there is no telltale stream? Shut down immediately. Check that the hose is on full and the muffs are seated over both screens, and clear the telltale outlet with a piece of light wire. If the stream still does not appear, the water pump needs looking at before you run the engine again.
Should I flush a freshwater boat too? It is less urgent than in salt water but still useful, since silt, sand and mineral deposits accumulate in cooling passages regardless of water type.
Can I flush with the engine tilted up? No. Flush with the leg tilted fully down so the intakes are in their normal orientation and the passages drain afterward. A tilted engine can trap water in the leg and can affect how the pump draws.
The Bottom Line
Flushing is a fixed sequence, not a judgment call. Level ground, leg down, muffs seated over both intakes or the port adapter threaded in, water on full, start and confirm the telltale, idle in neutral for the time your manual specifies, engine off, then water off. Do it the same day as the salt trip. For the hardware, see our motor muffs guide, and the seasonal version of this job is in our outboard winterizing walkthrough.